This is a story of a promise made.
When planning a piece of work, the last thing I want to do is set an expectation that I can’t match. By now, I figure I should know iOS, UIKit, Foundation, all of it inside out. I have been doing this for a while now, you know, I should be an authority.
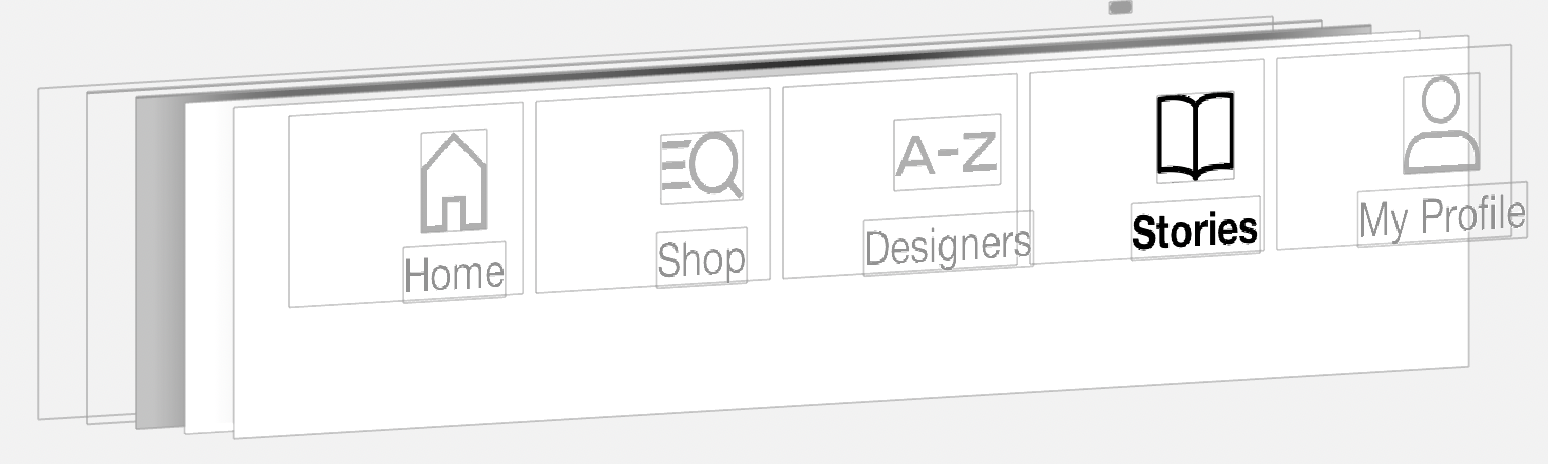
When I say “Sure, we can add subviews to a UITabBarItem”, I mean it.
Except.
Having a read of this page https://developer.apple.com/documentation/uikit/uitabbaritem, it’s pretty obvious that you can’t.
You can set two images for a selected and deselected state. You can set a badge colour and badge number. You can even set the text styling for the badge.
But that’s it.
I had two options after reading the documentation; I could update my task description to work with the available functionality of the UITabBarItem class, or I could go on a voyage of discovery - plotting my way through uncharted seas, documenting the many stimuli and experiences that I encountered on the way.
It’s not even an option, is it?
False Dawns
I was stuffed. I had my plan of what I wanted to do - sub-class UITabBarItem, initialiser that accepts a couple of Lottie animation files, add them as a subview and switch between the two when the selected state changes - simple!
final class AnimatedTabBarItem: UITabBarItem {

    private let animationName: String
    private let selectedAnimationName: String

    init(animationName: String,
         selectedAnimationName: String,
         image: UIImage,
         selectedImage: UIImage,
         title: String?) {

        self.animationName = animationName
        self.selectedAnimationName = selectedAnimationName

        super.init()

        self.image = image
        self.selectedImage = selectedImage
        self.title = title
    }

	func animate() {
		//add Lottie animation here
	}
}
I had a good start, this was looking positive. I could instantiate my tab bar item and when needed, would call an animate() function to start the animation going.
Breaking Point
And here I hit trouble. To add the animated views to the button, I needed a view to add them to. But there are none exposed. There are views there, there must be, because I can see them.
Not one to doubt my own eyes, I started to think.
I did what I normally do in situations like this, where I’m confused, frustrated and overly curious. I put a breakpoint inside my animate function and tried to see what the hell was going on.
When stopping at a breakpoint, the debugger presents two windows. The right pane gives the console where you can enter commands to inspect and interact with the program. The left pane shows the variables and objects relevant at this time.
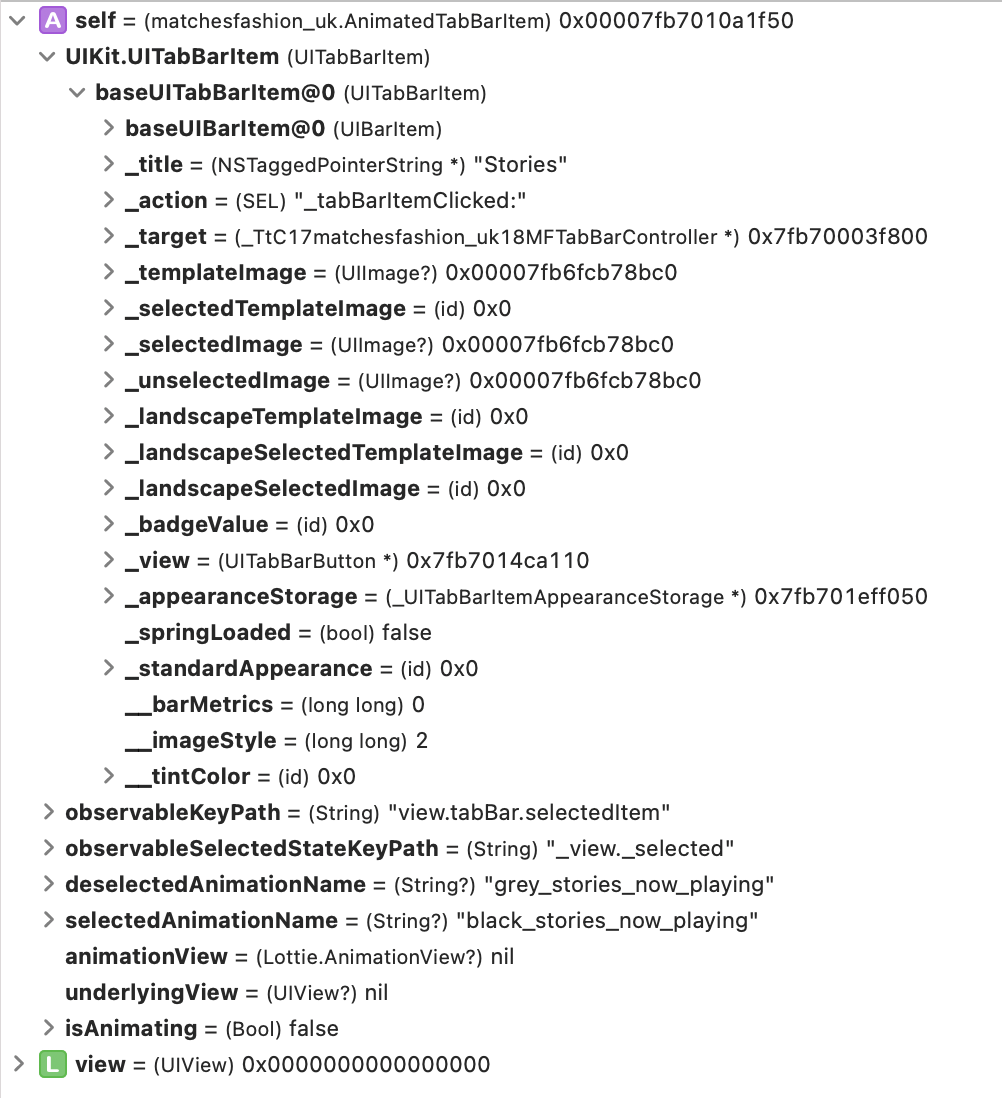
The variables pane here shows my TabBarItem (self) at the top. And by clicking the arrow, it expands that TabBarItem’s properties to show us details that aren’t available through the class definition in the UIKit header.
Now to go digging.
Argh-cheology
Opening the properties, I saw something with potential. A _view item with a value of UITabBarButton. What’s a UITabBarButton? There’s no Apple Documentation available (And I use Dash, if it’s isn’t there, then it isn’t there.)
What am I looking at?
A UITabBarButton is an internal UIKit object, one of the building blocks of how the UITabBarItem is put together. I needed a way to be able to investigate whether I could use this in my code as a reference point for adding my animated view.
To do this, I would use KeyPaths.
A KeyPath is a way of referencing a property on an object instead of referencing the value of that property. For example
struct Album {
	let artist: String
	let title: String
	let songs: [Song]
}

let album = Album(artist: "Grizzly Bear", title: "Shields", songs: [])
let albumTitleValue = album.title
// albumTitleValue is a string
let albumTitleKeyPath = album(keyPath: [\Album.title])
// albumTitleKeyPath is a KeyPath object of KeyPath<Album, String>
You might notice that the syntax in swift uses defined properties. As in, I have to have access to the properties I wish to use as key path’s - one of the benefits of Type Safety.
It’s not much use to me though, since I don’t have direct access to the property I want. How can I use a KeyPath to get a property if I don’t have access to the property I’m trying to use a KeyPath to get?
But all is not lost. There is a function available on classes that are compliant with the NSKeyValueCoding protocol (of which UITabBarItem is) that I can use instead.
And even better, it uses one of the wonders of Cocoa/Objective-C under the hood - the fact that any object that conforms to NSKeyValueCoding will have it’s properties accessible (and traversable) by string.
While on the breakpoint, I moved over to the debugger and typed out a single line.
(lldb) po self.value(forKey: "view")
And got back a result
- some : <UITabBarButton: 0x7fe2aecb9ad0; frame = (236 1; 74 48); opaque = NO; layer = <CALayer: 0x7fe2affe0370>>
I’d struck gold.
I had a way to finally get access to a view on this item! All I had left was to add my animation view as a subview, start it animating and I could go back to my JIRA board with confidence, proudly moving my ticket to Code Review column.
Except …
Natural Selection
Selected state. How do I keep track of the selected state?
I didn’t want to expose anything outside of the TabBarItem to force the change of state - for example, no extension to my animate function like animate(isSelected: Bool). I wanted this object to behave like it’s parent class, handling the switch between modes itself.
To do this, I could leverage Key-Value Observers.
Key-Value Observing (or KVO) is a way to register to be notified of any changes to a defined property. For example, we could register an observer onto a volumeLevel property to update a UI element. The keyPath in this instance is
class AudioEngine: NSObject {

    @objc dynamic var volumeLevel: Int = 0

    override init() {
        super.init()
        addObserver(self,
                    forKeyPath: "volumeLevel",
                    options: .new,
                    context: nil)
    }

    override func observeValue(forKeyPath keyPath: String?,
        of object: Any?, change: [NSKeyValueChangeKey : Any]?,
        context: UnsafeMutableRawPointer?) {
        if keyPath == "volumeLevel" {
            volumeChanged()
        }
    }

    func volumeChanged() {
        // Update UI with the value of volumeLevel property
        print("new volume: \(volumeLevel)")
    }
}
In this example, I’m telling the observer to be notified when it receives new values to the property and then do some other work, in this case to print the updated volume to the console.
In the modern Swift world, KVO is used less, favouring willSet{}, didSet{} callbacks on properties. The same behaviour can be replicated in this manner.
    var volumeLevel: Int = 0 {
        didSet {
            print("volume: \(volumeLevel)")
        }
    }
Going back into “Detective Mode”, and experimenting in the debugger, I saw that I could call po self.value(forKey: "_view._selected") which would return the correct state of the button. I figured I could use KVO on this keyPath and be done.
No such luck! Creating that observer didn’t return any reaction to changes. Why?
From looking at the documentation on KVO implementation, I noticed that when wanting to use KVO in our own objects, it was necessary to add the
@objc dynamickeywords as a prefix to any properties. This is an assumption, but it could be that the underlying (not publically accessible) property withinUITabBarItemdoesn’t have this designation and therefore it can be accessed viavalue(forKey:)but not observable.
I had to get my pickaxe out again.
Through a long and arduous process of trial and error, looking at the object debugger, typing value(forKey:) with different values to see what was both available and available to be used with KVO, I landed upon a usable solution:
view.tabBar.selectedItem
Inspecting properties of the TabBarItem itself yielded no usable options, but I was able to reference the parent TabBar for the item and infer the selectedItem of the whole TabBar.
Observe and Report
I could now respond to the changes of state of the TabBar by adding the observer in the init() of my custom TabBarItem.
In my responding function, I would be able to call my animate() function to add the right Lottie view to the item for the current selected state. I could use once more the value(forKey:"_view._selected) function to get the value.
All that was left to do was to clean up my observers - making sure they were removed on deinit - and ensure that my Lottie animation view was only ever present once in the view hierarchy. The last thing I wanted was to be adding new UIViews each time the tab bar state changed.
With this done, I had a subclassed UITabBarItem which could be animated successfully.
final class AnimatedTabBarItem: UITabBarItem {

    private let animationName: String
    private let selectedAnimationName: String

    init(animationName: String,
         selectedAnimationName: String,
         image: UIImage,
         selectedImage: UIImage,
         title: String?) {

        self.animationName = animationName
        self.selectedAnimationName = selectedAnimationName

        super.init()

        self.image = image
        self.selectedImage = selectedImage
        self.title = title

        addObserver(self, forKeyPath: "view.tabBar.selectedItem",
                    options: .new,
                    context: nil)
    }

    func animate() {

        if let parentView = self.value(forKey: "view") as? UIView {

            let selectedState = self.value(forKeyPath: "_view._selected")

            // 1. Create Lottie animation with correct file for selected state
            // 2. Create Lottie animation view to contain the animation
            // 3. Add animation view as a subview to parentView
        }
    }

    override func observeValue(forKeyPath keyPath: String?, of object: Any?, change: [NSKeyValueChangeKey : Any]?, context: UnsafeMutableRawPointer?) {

        if keyPath == "view.tabBar.selectedItem" {
            animate()
        }
    }
}
Wrap Up
We sometimes forget that Swift is built on top of, and alongside, incredibly powerful features of the Objective-C language. Although it can be dangerous, being able to leverage inspection and access of objects in our projects in an “indirect” direct way can offer great results and unique experiences. On the odd occasion, it can be useful to look back over our old Objective-C books and reference guides to appreciate how flexible a language it can be.
We do have to exercise caution, by not having direct access to some of these hidden attributes, we need to make sure we are defensive in how we apply these techniques in case future iOS updates mean that this approach no longer works.
I also recognise that I can’t know everything ahead of time, but am always discovering new ways of doing things and new features of the platform.
And now that I know what a UITabBarItem can and cannot do, next time I’ll recommend to my team that we take an alternative approach….